Thursday, November 30, 2006

Today was a productive multi-task day. The morning started with marbling Yukon Gold. It is one of my original colors and I love seeing how it has evolved. You could say the light bulb came on and I changed the blue. Amazing what a different tone of blue will do, it just made the colors POP! I will put some up after they cure and have their bath.

Next I moved on to dying fabric. My husband Mike dubbed it "now that's purple." A rich deep dark purple, that is currently in the dryer.

Then I was off to alum some Fat Half (22" x 36") pieces. I have found them very useful when I am making Wearable Art pieces like the Green Coat that is currently displayed on my website at: http://marbled-arts.com/gallery23.htm The front and back center panels both use Fat Halves of evergreen hand marbled fabric.

After that I worked on the Sweatshirt Jacket that is under construction. I wanted something fun to wear with jeans. I'm using some navy hand marbled fabrics and mixing it with a variety of navy fabrics that I have in my stash. It has become a experiment in meandering stitches. Each project that I make will ultimately end up in my booth at quilt and art shows. But I also want each project to be a learning experience.

Now Blogging and then create dinner. Humm, what should it be tonight?


Sunday, November 26, 2006

Greeting from the snowy Pacific Northwest. The Weather people said last night that we would get between 1 to 3 inches of snow over night, they neglected to mention that it would continue to snow all day long. We now have a foot. I know that in many parts of the world that isn't much. But here in the PNW, with no signs of stopping, that is considered a lot of snow.

Marbling tip for today. Marbling Books - there are many books written on marbling, you will find a large number are about marbling on paper. Some will be about marbling on paper with a little bit about marbling on fabric. My favorite book for beginners when it comes to marbling on fabric is: Creative Marbling on Fabric, a guide to making one-of-a-king fabrics by Judy Simmons. It's all about marbling on fabric. Judy takes out threw the basics. What you need and where to get it. Followed by how to marbled on fabric with a wide variety of marbling designs. A very helpful section what to do when things go weird. And then some ideas on what to do with your hand marbled fabric.

Labels:

Thursday, November 23, 2006


Here is another tip to help make marbling fun and easy.

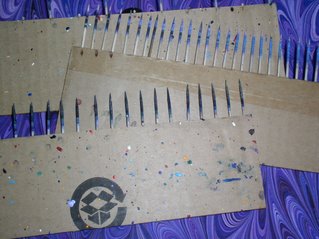
How to make rakes with corrugated cardboard, glue and toothpicks. These are rakes that I made for a marbling class that I taught. My students use a 8" x 10" tray. I made the rakes 1/2" smaller than the tray. One is 7 1/2" in length and the other is 9 1/2" in length.
Cut the corrugated cardboard so that you see the wavy side on the length you want for your rake. Figure out how far apart you want your toothpicks. You can mark the cardboard. Put the glue in those holes and insert the toothpicks. Stand them up with the toothpicks pointing up and let them dry for 24 hours.
I have three rakes for each length. The First is spaced one hole apart, the second two holes apart and the third four holes apart. That gives you enough rakes to create a large variety of designs. Experiment and have fun.

Labels:

Thursday, November 16, 2006


My new featured fabric for November/December is Poinsettia Red. Just in time for Christmas. This is a Orange based Red that always reminds me of the Pionsettia plant that I get every year from my father inlaw. That is how I know that Christmas is just around the corner and it adds a festive air to our home.
You can view it as well on my web page http://www.marbled-arts.com

Tuesday, November 14, 2006


Helpful Hints the things that help make marbling easier and more fun. First is mixing the marbling base and alum solution. My arm almost dropped off the first time I tried mixing everything by hand. Then I found two very helpful tools. First is a power drill. (My husband never dreamed that he would be sharing his power tools with me, but he has adjusted nicely.) The second is a paint mixer that fits in a power drill. You can get them at most hardware stores. You have just turned your power drill into a big hand mixer.
I normally mix 4 gallons of marbling base and 8 gallons of Alum solution at a time, so these two tools together make life so much easier. You may want to try it out in just plain water until you figure out the right speed. I shot water all over the place the first time. Now I don't dread the mixing of the solutions and I get a much better mix.

Labels:

Tuesday, November 07, 2006

I have gotten several questions about "How to marble on fabric?" But rather than duplicate directions that are easily found else where. The best set of directions that I have found for beginners is located at:
http://www.prochemical.com/directions/Marbling.htm
They also sell a marbling kit that is easy for beginners. You can give it a try without a huge investment. Pro Chem's kit doesn't require a lot of mixing and prep of the paints. Yes, you still have to mix every thing else.

I think many people are intimidated by the thought of marbling because it is not an easy afternoon project. Sorry but it does require planning and prep. I'm totally addicted to the entire marbling process so I believe that it is worth ever minute.

So what I thought I would do is give you easy tips and hints on things I have learned that could make your first marbling experience more fun. So stay tuned.